
Who is Slinkachu?
Slinkachu is a British Street Artist and Photographer, he is best known for his 'Little People Project' which started in 2006. This consists of scenes of tiny painted train model figures, which he places around London in different environments to create a unusual picture. It may be everyday scenes, or accident scenarios his pictures aren't just ordinary pictures they all tell a story of their own. His work is unusual and unique!
Slinkachu also had other out of the ordinary projects. One of his other well known project is 'Inner City Snail' which started in 2008. This project involves of decorating snail shells with non-toxic paint, then setting them free again to continue with their lives. It's all based in London, but has done other "work" in a number of large European countries. Slinkachu says "I paint to turn the sluggish molluscs into miniature masterpieces of urban art."
Here are some examples of his work on the 'Little People's Project:


Here are 3 of his top pictures that are eye-catching and I like them. I have analysed them and am hoping for his work to inspire me to create and take some little people pictures of my own...


|
I really like this picture as it is a really good example of silhouette photography. The use of the light coloured sky brings out the man and the horse in the sunset atmosphere. The photographer has used no flash so the man on the horse has been left dark. I think the photographer has slightly under exposed this picture, to give it a good affect. The focus point would be set on the horse and man as the background is slightly out of focus. The rule of third has been used as the horse is placed on a focal point.
|
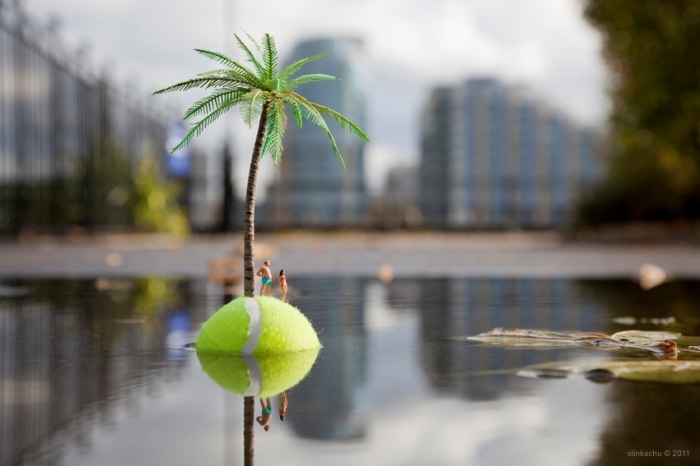
This picture tells a story of some people being stranded on a island. This photograph also uses a small depth of field, with the tennis ball island and small pine tree in focus and the background is out of focus. This is a very imaginative photograph and tells a amusing story. This picture makes this island seem tiny and far away from the city. You can also see the reflection of the island, people and city in the water giving this picture great effect.
|
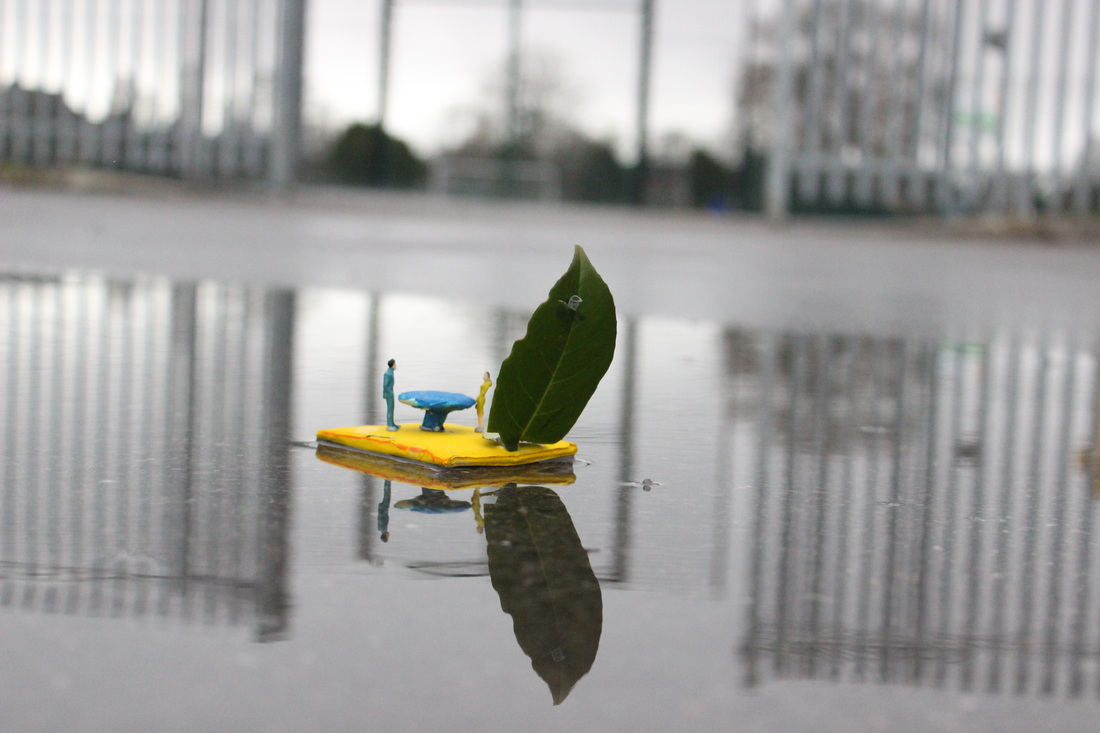
The photographer has used a medium depth of field as the bottle top boat and puddle is in focus, this is where the focus point would have been set. The background and a small proportion of the front is out of focus. I like how the photographer has used a bright coloured lid so it stands out in the grey picture. This picture is perfectly exposed. I also really like the reflection in the puddle as this gives it a realistic look.
|
David Gilliver....
David Gilliver is a photographer who focuses on creating light paintings and capturing landscape in his own style. In 2001, he graduated from the Fine Art Photography course at Glasgow School of Art. Over the past few years, his work has led him into doing some other projects such as, SPLASH!, Star Wars and Little People.
Similarly, to Slinkachu he has used little people to create scenes and stories, using food and other household objects. Here is some pictures of his attempt of the Little People Project:
Similarly, to Slinkachu he has used little people to create scenes and stories, using food and other household objects. Here is some pictures of his attempt of the Little People Project:


Here are his 3 top pictures that I really like. I have analysed them so I could maybe use some of his ideas for more own work as well as just Slinkachu's style...


|
This picture has a small depth of field as everything but the tiny man and the leaf he’s standing on is out of focus. The background is plain white making the plant stand out. The little man is in focus, letting them stand out in the picture at the front. The lighting is also good, as its not over exposed but isn’t under exposed either. The red watering can stands out against the green leaves as they are complementary colours.
|
In this picture I like how the photographer has used a middle depth of field. As only a couple of men in the middle of the picture are in focus, but then the rest of the background and some of the front is all isn't. There is contrast of the dark figures against the white sugar, which is effective. The exposure is also perfect. It’s nicely zoomed in so you can just see the little workers and the sugar cubes as the environment is in the picture. A compositional triangle in the centre by placing the pile of sugar there, this draws the viewers eye to the centre.
|
This has to be my favourite picture, mainly because of shadow in the egg shell off the two people. The black background and surface lets the rest of the picture stand out. There has been a spot light used to create the shadow. The exposure is perfect. They have used a middle depth of field as the tiny people and main eggshell is in focus, meaning the focus point would've on the people.
|
PIERRE JAVELLE AND AKIKO IDA....
Pierre Javelle and Akiko Ida are food photographers, that met while studying photography at the Arts Decoratifs art school in Paris. Both share an interest in food photography, which is probably why they have a project known as ' MINIMIAM'. This name was given to this project as “miam” in French translates to “yum” in English, and obviously "mini" as they have used tiny figures. Since 2002, they have been shooting playful photos of miniature people in a world of over sized food. The main purpose for their work is to make people smile. They have used tiny figured just like Slinkachu, the only difference in their work and his, is that they use food, to create more realistic scenes.


Here are 3 of his pictures that I really like, so I have analysed them. They are playful and amusing photographs, that have story behind them...


|
I really like the concept of this photo. As it's like the little men are working, to put the cherries in the cupcakes. I like the depth of field used, how the background and some of the front is out of focus except for the men in the middle and the cupcake in the middle.
|
This photo has to be my favourite because the story being told here is really fun and realistic, not only that but the techniques used are also very good. The best thing would have to be the water drops captured on the chillies, making it look like a fire. Also the depth of field and the focus point is also really effective in this picture. The red fire truck in the background adds compositional balance with the red chillies at the front.
|
This picture has a really amusing story behind it. I like how they have used just donuts to create people playing golf. The depth of field has been used effectively, as they have blurred the front and background of the picture, all except the middle of this picture. The picture is nicely exposed. I like how you can see loads of donuts in the distance which are out of focus. This picture has been taken from birds eye view a bit, making it look good.
|
First Photo Shoot...
My Plan -
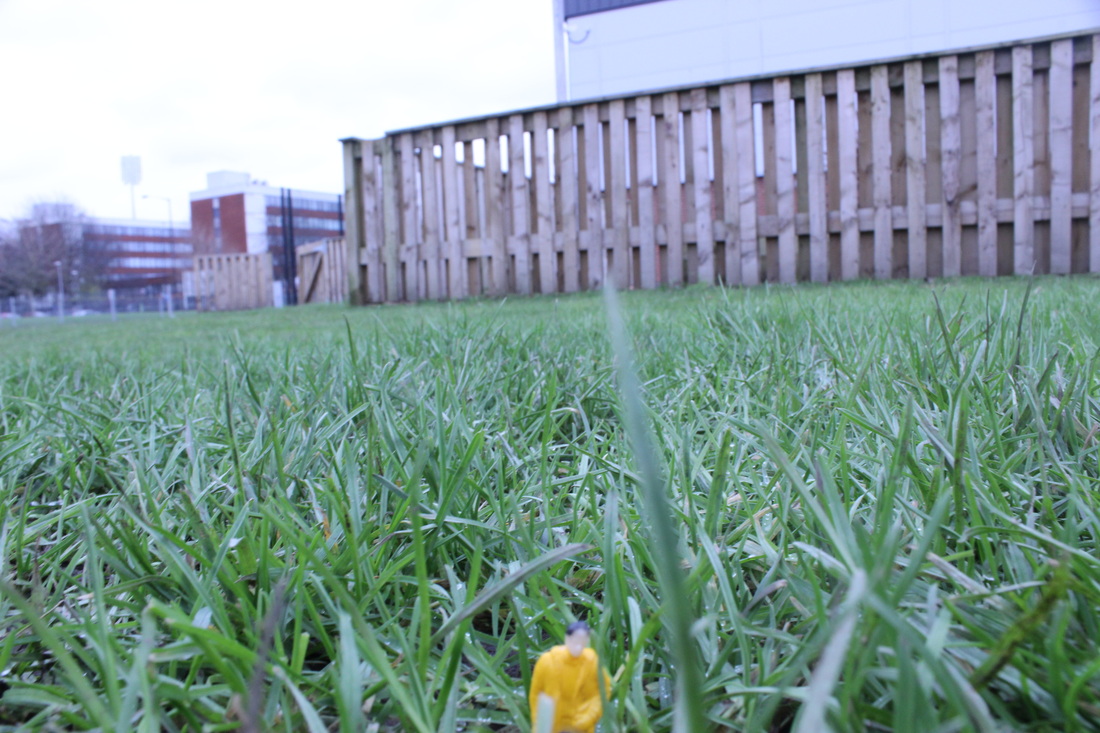
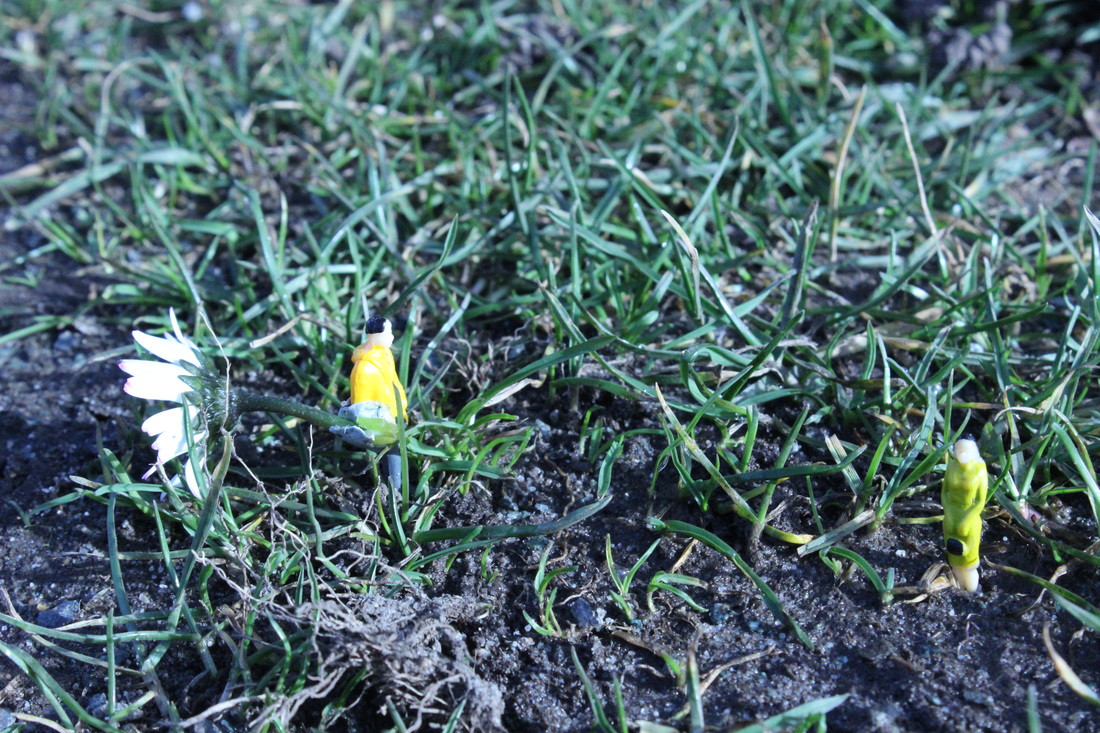
For my first shoot, I just want to get use to the tiny people and try different focus points I'm going to try F5.6, F8, F16 and F36. I am going to do this so I can see which ones look the best and how each one effects the picture to use in my future shoots. I am going to be putting a small person in the grass and I am going to try and capture the wet rain droplets on the grass. I am going to try making sure it has perfect exposure so its not too bright or not too dark. Also I am going to try taking the picture from different view points, also I'm going to take it close up and far out.
Here are all my photos from my first shoot:


My WORST PICTURE!

|
This would have to be my worst picture in this it is all out of focus. It is also quiet light meaning it's a bit over exposed and I haven't captured any water droplets.
The 3 pictures below, are also over or under exposed. They are all out of focus and I haven't captured any droplets either. In some of them you can hardly even see the tiny person, instead it's just a blur. I tried to capture the tiny person in the environment but because the tiny person isn't in focus you can't really make out what it is. |


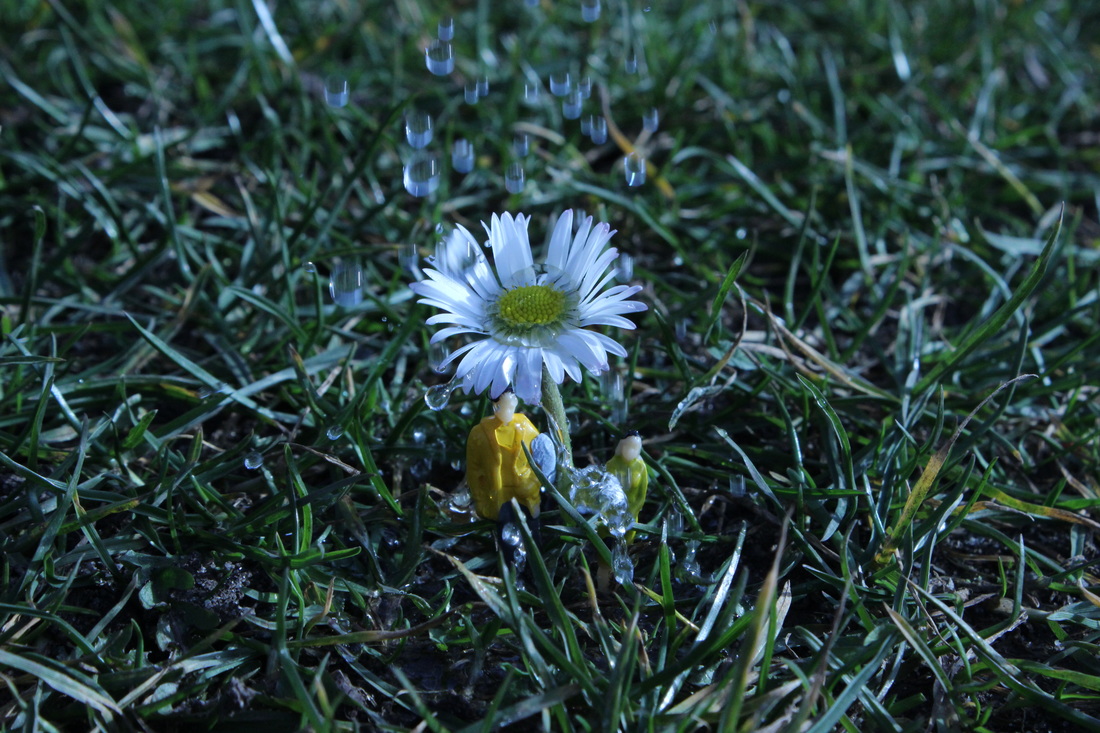
my Best picture!
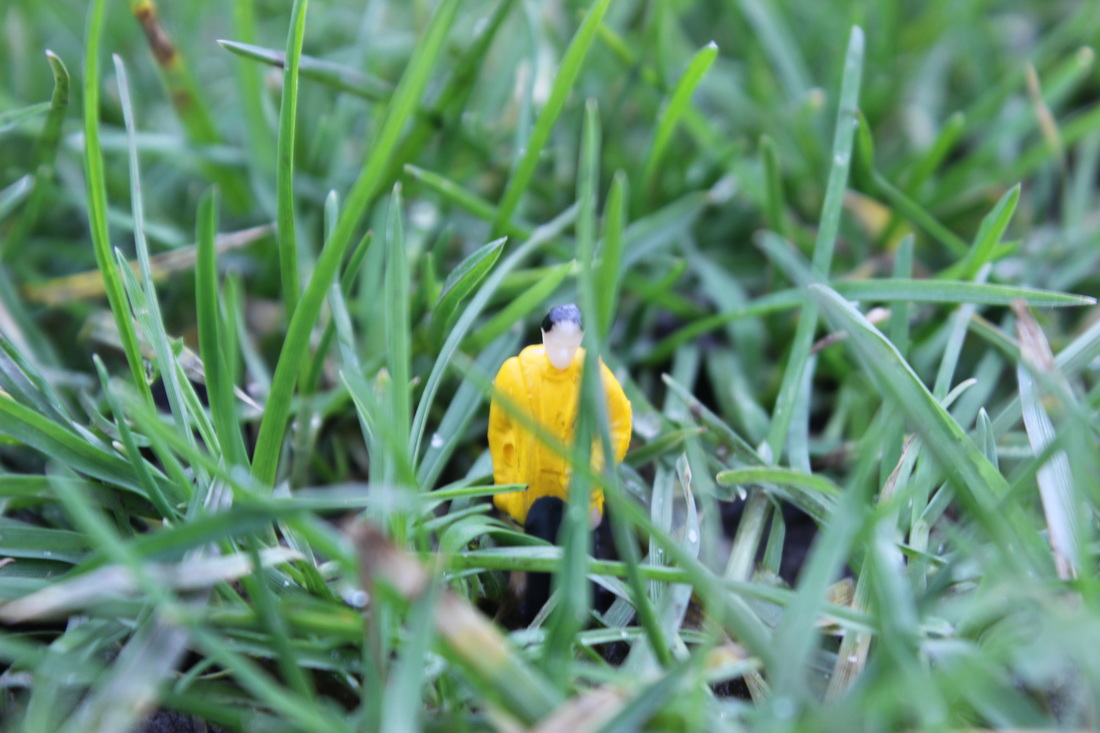
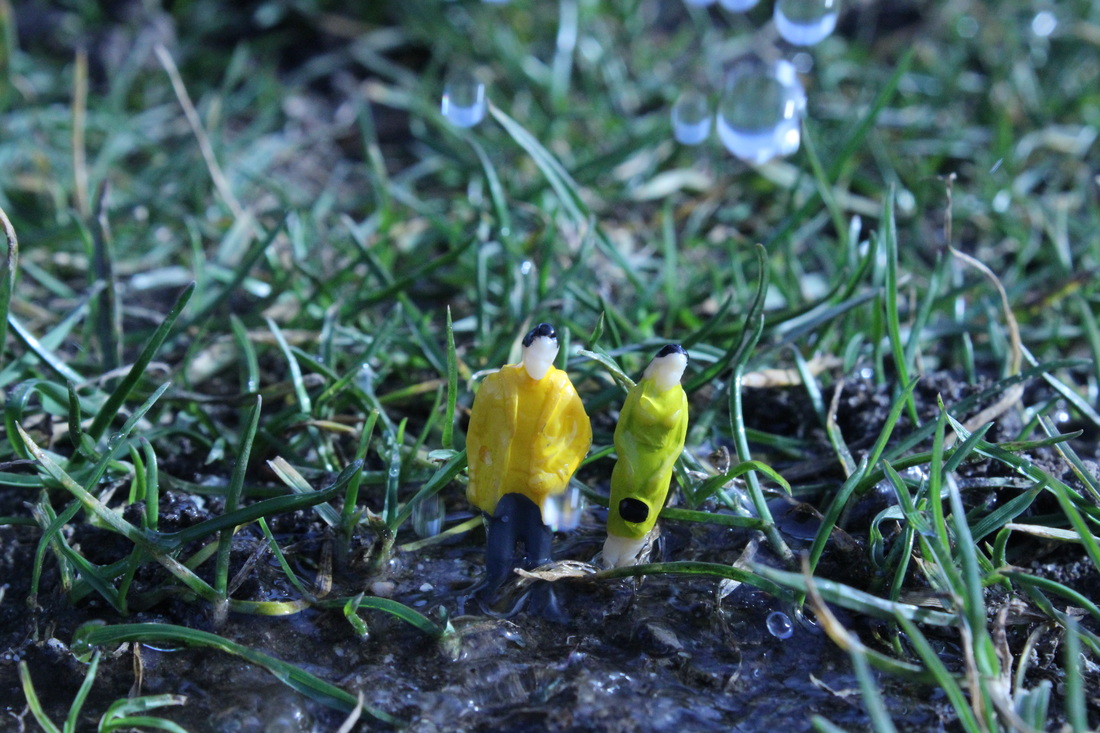
This picture would have to be the best because the tiny person is in full focus. Also, I have captured the droplets of water in the grass, as I wanted to. It's got a small depth of field and I've got exactly what I want in focus. The front is out of focus so is the background a little blurred out. I am very proud of this picture as in my opinion it is eye catching.
The 3 pictures below are also some of my best pictures within this photo shoot. They are all from different angles, mainly birds eyeview and everything is in focus. They have different depths of field making some of the pictures have blurred backgrounds or just a bit at the front of the pictures is blurred. You can see the wet grass and you can also see the little person in focus.
The 3 pictures below are also some of my best pictures within this photo shoot. They are all from different angles, mainly birds eyeview and everything is in focus. They have different depths of field making some of the pictures have blurred backgrounds or just a bit at the front of the pictures is blurred. You can see the wet grass and you can also see the little person in focus.


Second Photo Shoot...
My Plan -
For my second photo shoot, I am going to try and use 2 tiny people, this means making sure I get both of them in focus. I will be using F5.6 so I get them in focus and the background is blurred out. I may also try using a range of depths of fields such as F16 or F36, so the front and back will be blurred out. I am going to try getting it perfectly exposed so it's not too dark or light. I am also going to take it from different angles, such as worms eye view, birds eye view and just normally as well as it being zoomed in and zoomed out. I am going to take 2 tiny people, a man and a women and put them on the banister standing together. I am using the banister because its not flat instead it's at a angle making it different.
Here are all my pictures from my second shoot:


My WORST PICTURE!

|
This picture would be one of my worst just because it's out of focus which if I was must steadier then I think it would have been just great. Also you an see the blue tack used to stick them down into place which it would have looked much better if I had hid it better.
The 3 pictures below also could have been better if they were in focus and maybe a little zoomed in more. I like the angles I've taken them from. The background is more in focus than the actual figures. |


my Best picture!
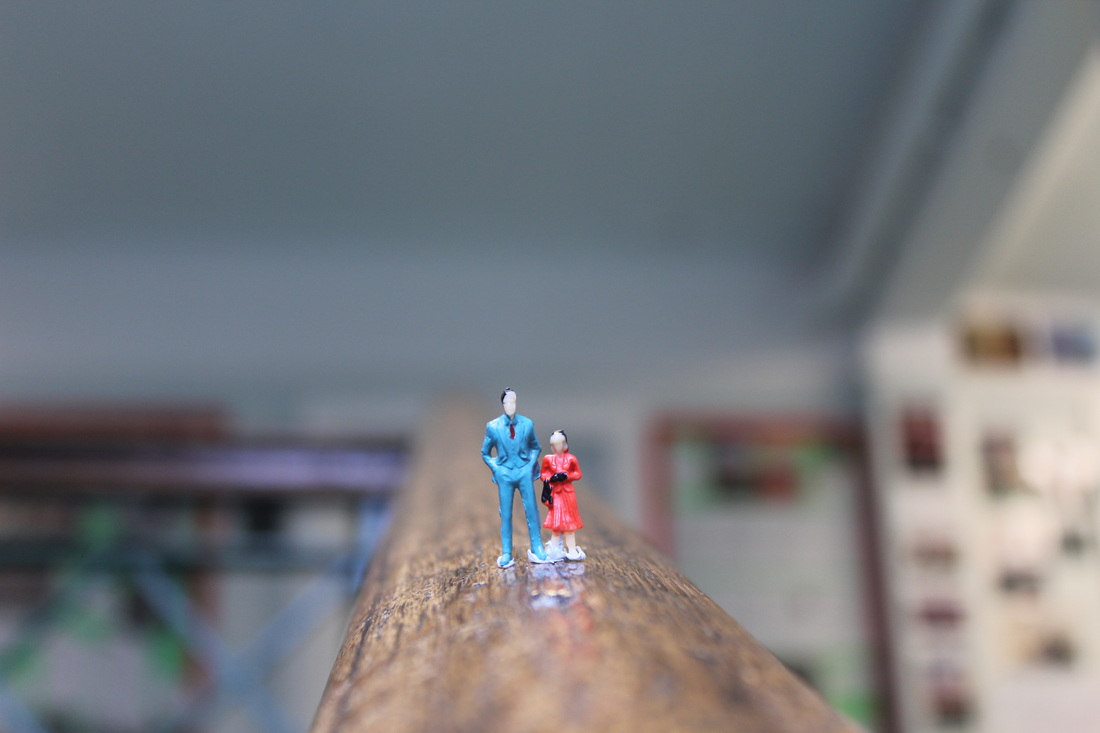
This would have to be my best picture of this shoot because the 2 little people are both in focus making them stand out in the picture, as the background and front of the picture isn't in focus therefore I've used a middle depth of field. I also like the angle that I've used because it is a little like worms eye view but just not looking that up on the figures.
The her 3 pictures below, I like because they are all in focus and they are all from different angles.
The only thing that I could have done better is hid the blue tack I've used to stick them down.
The her 3 pictures below, I like because they are all in focus and they are all from different angles.
The only thing that I could have done better is hid the blue tack I've used to stick them down.


My Third Photo Shoot...
My Plan -
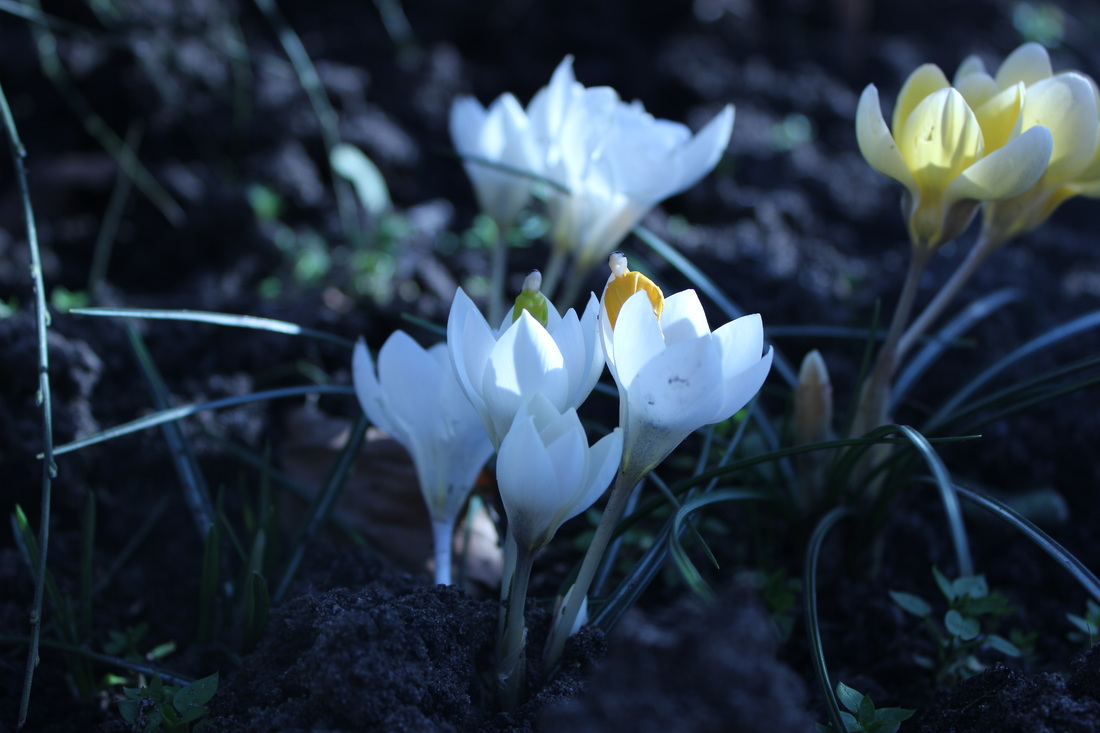
For my third photo shoot, I’ve decided to use 2 little people and put them outside in the flowers. I’m going to be zooming in just so I can mainly get them in the flowers in my picture. I want the background to be blurred and maybe the other flowers in the background can be blurred out. I will be taking this picture from different angles but mainly just straight on and normally. The focus point is going to have to be in the centre so it’s near both of the little people as well as the flowers that they are in. I need it to be perfectly exposed, not too dark or light. I will be using white flowers so that the little people in them stand out, also so the other colour flowers will be in the background, these will be real flowers.
Here are all my pictures from my third shoot:


my worst picture!

|
This would have to be my worst picture of the shoot, just because it's zoomed out and you can't really see the little people.
The 3 pictures below are also my worst ones as they are either, zoomed out too much, can't see the little people or the exposure isn't very good. I think I could have steadied my hands a bit better or leaned the camera on something, so that it's in line properly and it doesn't come out blurred. Also, just check the exposure to make sure it's perfect and not too dark or light. |


my Best picture!
This would have to be my most successful picture of this shoot, as the tiny people are in focus and the background is out of focus, just like I wanted. The exposure is fine, not too dark or too light. I could have zoomed in a little more but I think it looks alright as I have got some of the background and surroundings in the picture.
These 3 pictures below are also some of my more successful ones, as the exposure is good. The tiny people are all in focus and the background in some are blurred out.
The thing I would try making better overall would be making sure I stand them up properly but apart from that I think this shoot went well.


Inspiration...

|
This flower shoot is very similar to Pierre's work as the colours he uses are more muted and subtle like the flowers in my shoot.

|
My fourth Photo Shoot...
My Plan -
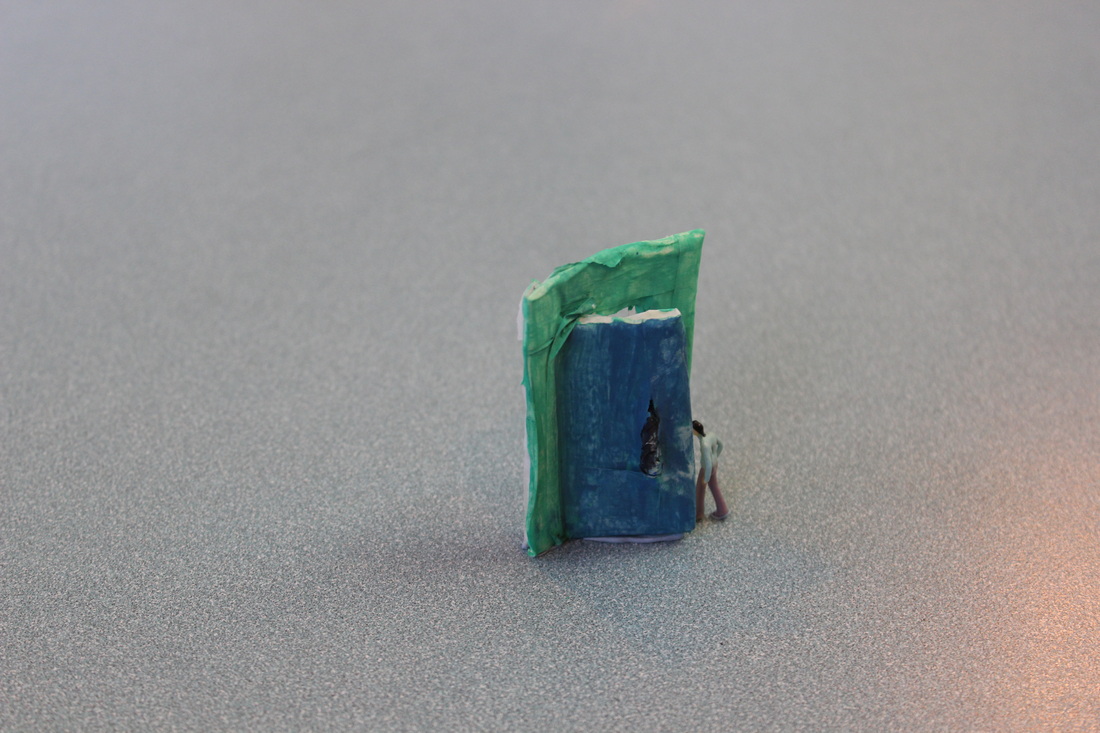
For my forth shoot, I’m going to make a miniature door, so that it can be as though the little man is going through the door. I will be making the door out of, cardboard and masking tape to make it stronger and steadier. Then I will be painting it as well so it looks a bit more realistic. I will be zooming right into the man and the door, so I don’t get any of the surroundings in the picture. The exposure should be perfect, not over or under exposed. I’d really like to capture the photo at different angles, from birds eye view and just normally, at one point I will take some pictures zoomed out this will be when I’m taking the picture from birds eye view. Not only do I want the picture zoomed in, I want it also to have the background and everything blurred out, except for the man and the door. I will need to change the focus point depending on the angle I take the picture from, to make sure that the tiny man and the door are in focus and not blurred like the rest of the picture.
Here are all the pictures from my forth shoot:


my worst picture!
|
This is my worst picture, because it is too zoomed out and the angle that I have taken it from I don't really like. Also you cant really see the little man properly.
The 3 pictures below are also some of my worst ones, as they are also too zoomed out and the angle in which they are taken from I don't really like. The angle that I've taken them from are birds eye view. Also they aren't taken straight, so to make them better it would be better if maybe I rest my camera on something and made sure that it's straight. I could try zooming in as well to make them better. |


my best picture!
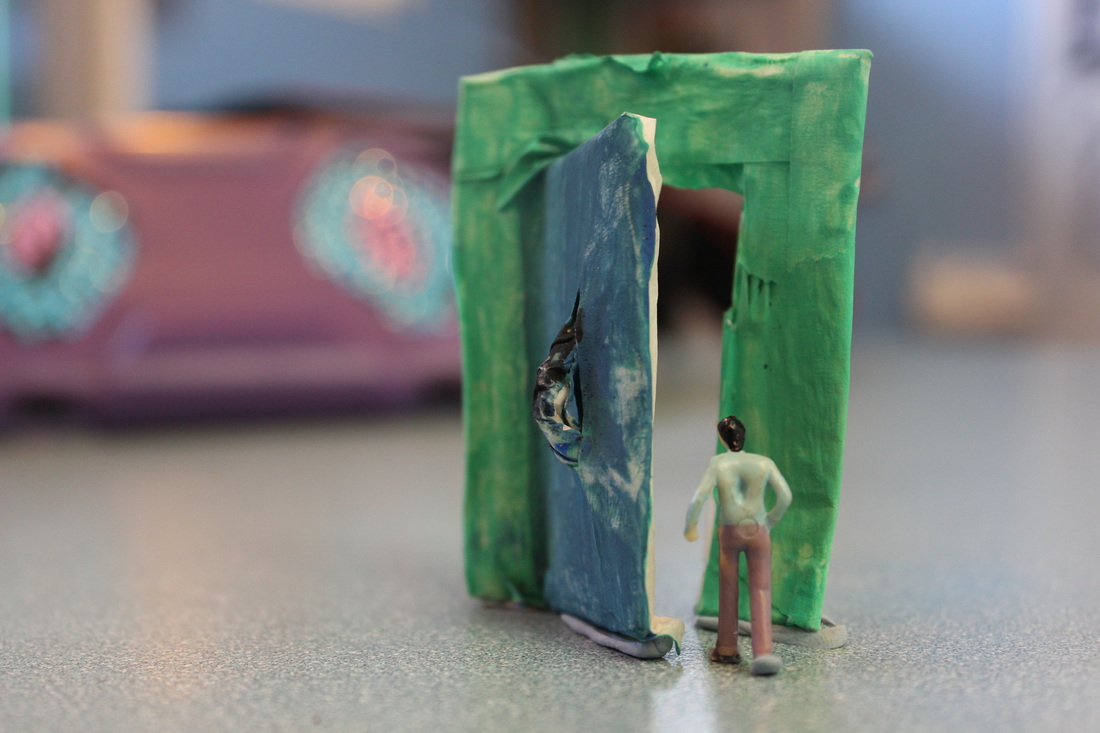
This would have to be my best picture from this shoot, because it's zoomed in and in focus. I have used my depth of field well to make the man and the door stay in focus but not the background. The exposure is also done nicely, so that this picture is not too light or dark.
These 3 pictures are also some of my better ones as they are in focus, zoomed in and perfectly exposed. They are also from different angles (birds eye view).
These 3 pictures are also some of my better ones as they are in focus, zoomed in and perfectly exposed. They are also from different angles (birds eye view).


My fifth Photo Shoot...
My Plan -
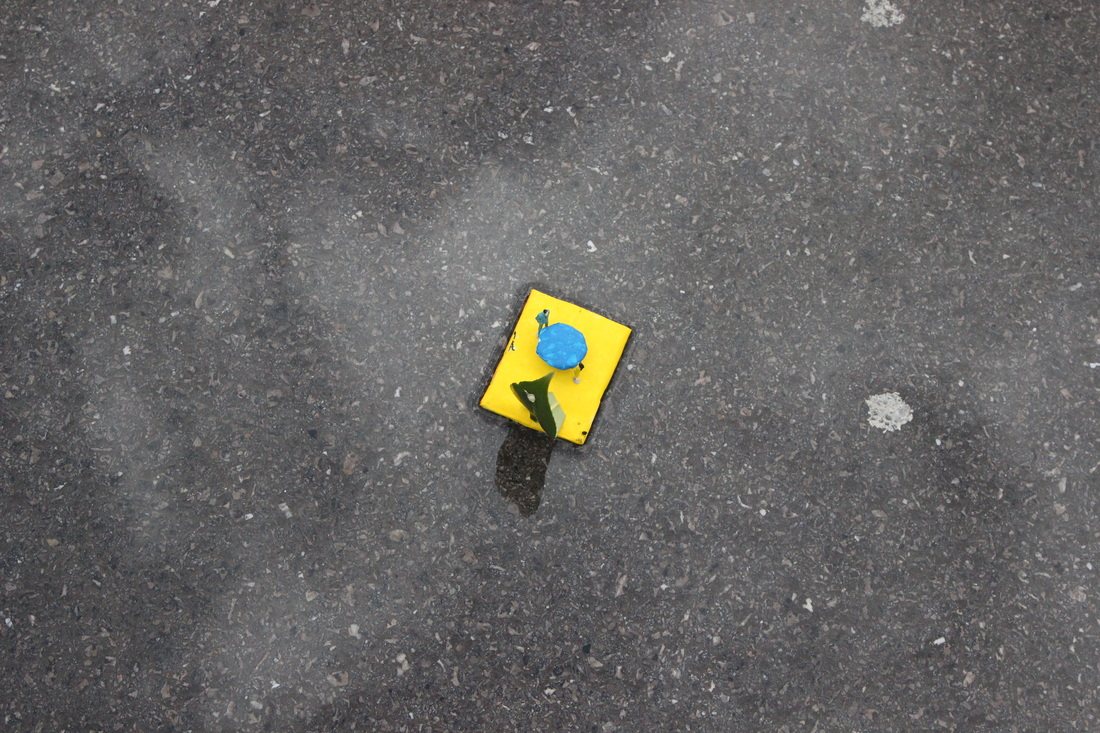
For my fifth photo shoot, I’m going to be making a miniature boat, with a small table on it and a leaf as the sail. I want to create the scene of the two little people on a date, on the boat hence the reason why I have a table on it. I will be making it again out of cardboard and masking tape. The leaf will be stuck on with straw to support it and blue tack to make sure it stays in place. The table will also be stuck on with blue tack to make sure it can stand, just as the little people will have. I will be painting it yellow so it’s nice and bright and the table will be painted purple so it stands out. I will be putting it in a puddle so it looks realistic and like and actual boat. I would like to capture the reflection in the water of the boat; also if it is raining I’ll like to capture the rain drops and ripples in the water. I need to make sure that it’s perfectly exposed, and that the focus point is on the boat to that it’s in focus, then the rest can be blurred out. I will be taking the pictures mostly zoomed in but I may also zoom out so you can see the surroundings and environment around it. I’m going to take the pictures also from different angles, mainly birds eye view and normally.
Here are all the pictures from my fifth shoot:


My WORST PICTURE!
|
These would have to be my worst pictures from this shoot because, it’s just too zoomed out, and you can't even tell what it is. You can hardly see the tiny people on it either. Also i think having taken this specific picture from birds eye view doesn’t really give it a good effect
These 3 pictures below are some of my worst ones as well because, I’ve moved the camera around whilst taking the picture, hence why they are not in focus. Also I have zoomed out quite a bit in these pictures. I just needed a steadier hand, and then these pictures would have been great as well. |


my best picture!
This would have to be my best photo from this shoot because; I have captured the reflection of the boat in the water making it look really effective and realistic. I have got the exposure perfect, it’s not zoomed in too much but then it’s not zoomed out too much. You can see the background and how it is not in focus.
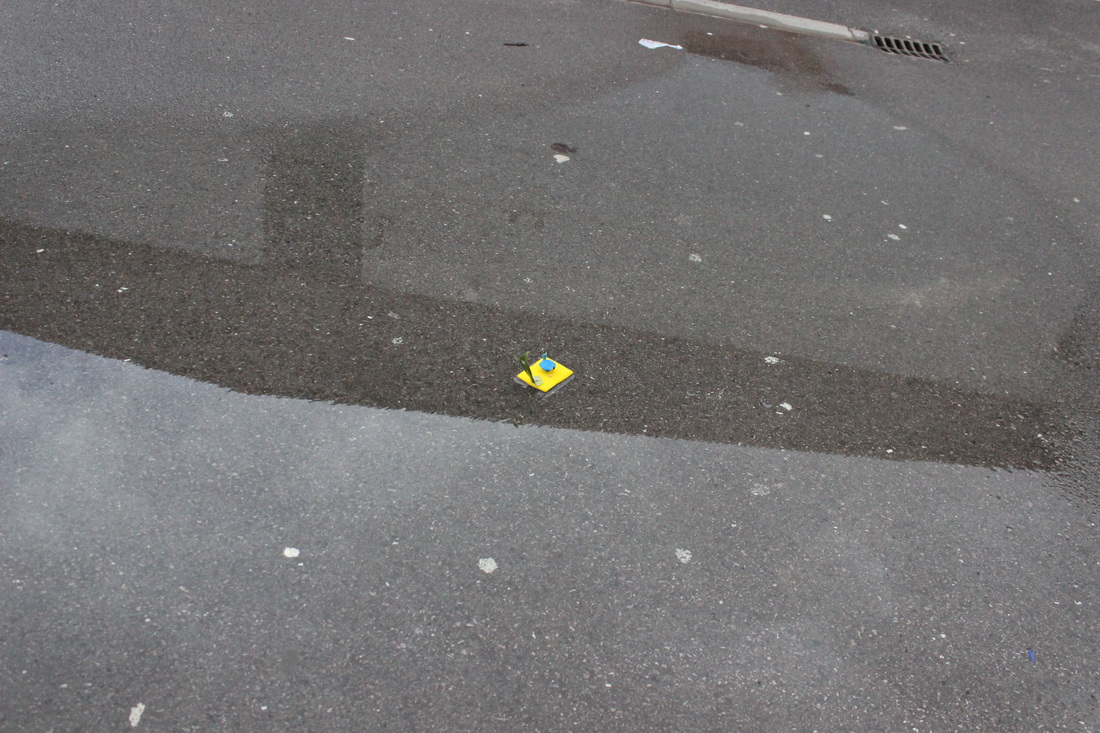
These 3 pictures below are also some of my best ones. The angles I have taken them from are good as you can see the boat and people clearly. In some of them you can see the reflection in the water. I could try and hideaway the blue tack a bit more but otherwise I’m very happy with these pictures.
These 3 pictures below are also some of my best ones. The angles I have taken them from are good as you can see the boat and people clearly. In some of them you can see the reflection in the water. I could try and hideaway the blue tack a bit more but otherwise I’m very happy with these pictures.


Inspiration...
|
I have used Slinkachu's work to create something similar, by having my background out of focus and capturing the reflection in the water.

|
My final Photo Shoot.... (3 take story)
Take 1...


Take 2...


Take 3...


My worst PICTUREs!


Here is a picture from each of my
takes within this shoot, which I think are my worst ones and could need some
slight improvements to make them better. The main problem with these pictures
are they are either under or over exposed, so if I had checked my exposure line
these would have come out better. Also I haven’t captured any water droplets in
them, so they don’t tell the story properly. Just as before I could have used a
lot less blue tack or I could have hid it a bit better.
My best PICTUREs!


Here is a picture from each of my takes within this shoot, which I think are my strongest and best ones out of all of them. They are perfectly exposed and the focus point is in the correct spot, so that the little people are in focus unlike the background. I’ve captured the water representing the rain drops, which was my main aim in this shoot. This was because of the fast shutter speed I had used. I like the angles I have taken them from and that I’ve zoomed in nice and close. The only thing I would want to improve is, to try hiding the blue tack a bit better so you can hardly see it. Otherwise I am very proud of my pictures.
The story...
aDJUSTMENTS ON fINAL pieces...
I felt that I could still improve my final pieces further, therefore I adjusted them on Photoshop by changing their levels, brightness and contrast to give them a more sharper and professional look.


Wall Of The Greatest.... |
& Adjustments.... |


Evaluation
After completing the Slinkachu project, I have learnt and used many techniques improving them as I go along. I can now make sure my pictures are perfectly exposed and in focus. To use different depths of field depends on whether the background is in focus or not, capture water with my shutter speed and take pictures from different angles. If I was to do this project again I’d make more props at an earlier stage and experiment with more different ideas. I could even try using some food, just like the other photographers. The things I would improve would have to be the steadiness of the camera, as I had shaken the camera whilst taking pictures, making them to come out blurred totally. Also at times some of my pictures came out over or under exposed so that would be something else I’d want to improve. After doing this project I’ve learnt so much about Slinkachu himself and his work. I can now take pictures of tiny things (people) just like him, as well as that I can also give my pictures meaning and a story behind them. So that was my Slinkachu project and I hope you have enjoyed looking at it, as much as I did making it!
